Configuring an Umbraco application on Azure
Note: This document is not finished, but can be followed for almost all steps. Please refer to previous projects for any missing bits.
This document goes through a standard scenario of configuring an Umbraco backend + frontend solution in a client's Azure tenant. It presumes using containerized applications for both web apps. See also the Azure naming conventions for relevant info.
Access to Azure tenant
An important prerequisite is to have account meeting the following criteria:
- Account created natively within the client's Azure tenant (not a guest account)*.
- "Owner"-level access to a subscription which should host the resources. Contributor-level is insufficient for assigning the correct RBAC permissions.
- Application administrative access to the tenant's Entra ID for app registrations**.
*This is required to be able to assign correct RBAC permissions. A guest account is not able to enumerate members and principals within the foreign tenant. A guest account with custom permissions to allow this would also work fine.
**Required for setting up service connections.
Structure
The general structure should consist of the following:
- Two app registrations/service connections, one for changing the image specifications for each application on release and one for pulling images from our ACR.
- Four resource groups, one for each front- and backend application and test + prod environments.
- Each backend resource group should have one of each of the following:
- User-assigned managed identity
- Azure key vault
- Azure SQL server
- Azure SQL database
- App service plan
- Web app
- Storage account
- (Application insights)
 '
'
Here's an overview visualisation of what resources we will end up with in production, replicated in test as well.
Step by step
From here on the resource creation process is described sequentially. If configured in a different order some prerequisites may not be present and you should then go back and finalise that first.
As a general statement we should follow the client's naming conventions within their tenant. For the purposes of this guide, we will presume there are no naming conventions present and use our own. The faux client will be called "northwind".
There are other ways to create and configure all necessary resources, take the following guide as an example. If you deviate from this guide, ensure you do not change the final outcome without reason. You're encouraged to update the guide with improvements. 🙂
Azure DevOps (1)
Start with creating a project within DevOps. Then navigate to project settings -> "Permissions" -> "[Project] Team" and add "Cloud Nine Developers" under "Members". You may also want to add co-administrators of the project as necessary.
Your goal is to end with the following service connections:
- Cloud Nine Azure Container Registry (Docker Registry connection).
- Cloud Nine GitHub (OAuth using the CloudNineServiceAccount, or the Azure Pipelines app).
- [Client] Azure ([Subscription name]) (Azure ARM connection to the client's Azure tenant).
- (Optional) Cloud Nine internal costs (Azure ARM connection to our internal costs subscription if you host a development environment application in Azure).
Set up the PR validation build pipeline using the pre-existing yaml in the foundation.
Set up the CI build pipeline using the pre-existing yaml in the foundation.
Note: The foundation default is a trunk-based approach to development. If this is not suited to your needs you must alter the build and release triggers.
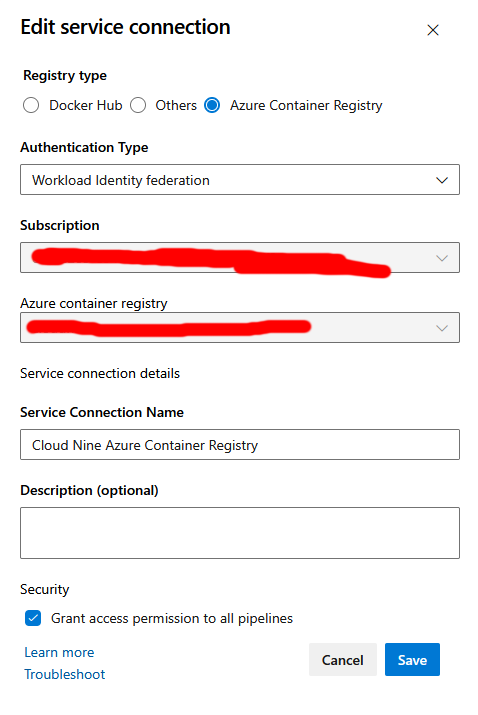
Azure DevOps -> Cloud Nine Azure Container Registry service connection
This connection is required for Azure DevOps to push new images to our Azure Container Registry (ACR). The name of the service connection must correspond to the name in the build/release pipeline yamls.
Create a new service connection within the project in Azure DevOps. Navigate to project settings, then "Service connections". Create a connection of type "Docker Registry". Prefer creating a connection of type "Workload Federated Identity" when connecting DevOps to ACR because they are in the same tenant. Note: The details of how to configure the connection has changed in the past, so this info might become out of date. You may need to consult MSDN if it's not possible to "click click configure" your way through the DevOps UI.
Foreign tenant -> Cloud Nine Azure Container Registry service connection
Within our own tenant, create an app registration to be used by the foreign client tenant to pull container images from our Azure Container Registry. Navigate to Entra ID -> App registrations and create a new registration named e.g. "Northwind Container Registry Service Connection". In the "Secrets" blade, create a new secret for the app with maximum lifetime. Save the secret immediately in 1Password as it is not retrievable after creation. If you forgot to save it, delete the secret and create a new one.
Navigate to our ACR namned "cloudnine" and add the following role assignments to it for the newly created app registration (labelled "Application" in the GUI):
- AcrPull
Azure DevOps -> Foreign tenant Azure (ARM) service connection
This connection is used by DevOps to update resources in the client's Azure tenant. It allows DevOps to set new Docker image references.
Within the client's tenant, create an app registration by navigating to Entra ID -> App registrations and create a new registration named e.g. "Cloud Nine Azure DevOps Service connection". Save the secret immediately in 1Password as it is not retrievable after creation.
Give this app registration "Contributor" access to the subscription using RBAC.
Then navigate to DevOps and create a new service connection of type "Azure Resource Manager". Configure the connection as the following:
- Identity type: App registration or managed identity (manual).
- Credential: Secret.
- Environment: Azure Cloud.
- Scope level: Subscription.
- Subscription ID: Subscription (guid) ID in the client's tenant.
- Subscription name: The name of the subscription.
- Application (client) ID: Application/client ID of the app registration.
- Directory (tenant) ID: The (guid) ID of the client's tenant.
- Credential: Service principal key.
- Client secret: Value from the secret (retrieve from 1Password).
- Service connection name: E.g. "Northwind Azure (subscription name)".
- Grant access permission to all pipelines:
true.
Note: As is warned in the DevOps interface, manual secrets management isn't great. However this method works and old secrets will eventually expire. Suggested improvements for moving to workload identity federation or other are welcome.
(Optional) Azure DevOps -> Cloud Nine Azure (ARM) service connection
This connection is only relevant if you are running an application in Cloud Nine's Azure tenant. You can set it up the same way as the connection directly above.
Backend test
We now set up the resources needed for our test environment within the client's Azure tenant.
As a general note, pick one Azure region for all of your resources, e.g. "Sweden Central" (or whatever is most appropriate for the client).
We do not use standardised resource tagging for resources within the client's tenant at this time. Within our own environments, remember to apply e.g. Client: Northwind.
Resource group
Create a resource group within the subscription following the client's naming standards. Here, we name it northwind-rg-webbackend-test. All subsequent resources for the backend test environment are created within this resource group.
Managed identity
Create a user-assigned managed identity. Name e.g. northwind-mid-webbackend-test.
Vnet
Create a virtual network with default configuration values (i.e. single default subnet, no advanced DDoS protection or similar unless there are elevated needs for the project). Name e.g. northwind-vnet-webbackend-test.
Further configuration of the virtual network is done continuously throughout this guide when adding service integrations for the app service, service account and key vault. We do not need to configure those manually now.
Storage account
Create a storage account. Name e.g. northwindstwebbackendtest. Configure as follows:
- [Basics] (Optional) Primary service: Azure Blob Storage or Azure Data Lake Storage Gen 2.
- [Basics] Performance: Standard.
- [Basics] Redundancy: Locally-redundant storage (LRS).
- [Advanced] Use all default values except for enabling "Default to Microsoft Entra authorization in the Azure portal".
- [Networking] Network access: Enable public access from selected virtual networks and IP addresses". Add the virtual network as an integration as well as the Cloud Nine L2TP VPN to the firewall whitelist.
- [Data protection] Use all default values unless your project-specific needs differ.
- [Encryption] Use all default values unless your project-specific needs differ.
After creation, navigate to "Containers" under the "Data storage" blade. Create three containers:
data-protection-keys.db-manual-backup(use this container when manually creating database backups).umbraco-media.
Then navigate to "File shares" under the same blade and create a new file share with the name umbraco-logs. Configure as follows:
- [Basics] Choose "Transaction optimised".
- [Backup] Disable backups unless you need them.
Repeat the above process create and create a new file share with the name umbraco-media-cache. Configure the same as the logs:
- [Basics] Choose "Transaction optimised".
- [Backup] Disable backups unless you need them.
SQL
Create a single database Azure SQL resource. Configure using the DTU purchasing model, e.g. 20DTU for both environments or 20DTU for test and 50 for prod depending on expected workload.
TODO: Add more details about SQL database configuration.
Apply the "Contributor" role assignment to the Azure SQL Server (not database) for the user-assigned managed identity.
Navigate to the "Security" blade and click "Networking". Create a new virtual network rule and add the virtual network.
Note: SQL service endpoints may not be enabled in the virtual network at this point. Attempting to enable this virtual network rule should allow you to enable it, but it can take several minutes to be applied properly. Wait a bit and try again after the service endpoint is enabled.
Key vault
Create a key vault using standard values. Configure it to be available from our L2TP VPN IP (193.234.23.132/32) and the virtual network (requires enabling the service endpoint like with the SQL Server). Also check "Allow trusted Microsoft services to bypass this firewall".
Gotcha: Key vaults have a more limited resource name length. It may be necessary to shorten e.g. northwind-kv-webbackend-test to something like northwind-kv-webbe-test, but try to stick to the same pattern.
Assign the managed identity the following roles:
- Key Vault Certificate User
- Key Vault Secrets User
Also assign our administrative account(s) as "Key Vault Administrator".
Add the following secrets as applies to your project (the names can be changed if wanted):
sqlconnectionstring: (One of) The connection string(s) to your Azure SQL database. Copy the topmost connection string which states "Active Directory Default" as the authentication type and addMultipleActiveResultSets=true;into the connection string for Umbraco to work properly. The result should look like this:Server=tcp:northwind-sqlserver-webbackend-test.database.windows.net,1433;Initial Catalog=northwind-sqldb-webbackend-test;Encrypt=True;TrustServerCertificate=False;Connection Timeout=30;MultipleActiveResultSets=true;Authentication="Active Directory Default";storageconnectionstring: The connection string to your storage account. Retrieve this by navigating to the storage account, then "Security + networking" -> "Access keys" -> "key1" -> "Connection string". Should look something like this:DefaultEndpointsProtocol=https;AccountName=northwindstwebbackendtest;AccountKey=[a long key];EndpointSuffix=core.windows.net.dockerregistryusername: The username for connecting to Cloud Nine's ACR. Retrieve from your foreign tenant -> CN ACR app registration in Cloud Nine's tenant called e.g. "Northwind Container Registry Service Connection" and copy the "Application (client) ID" (a guid visible in the overview).dockerregistrypassword: The password for connecting to Cloud Nine's ACR. The value should be the generated secret to the foreign tenant -> CN ACR app registration. If you did not save this in 1Password earlier, scrap and re-create the value as it is non-retrievable after creation.
App service plan
Create an app service plan, name e.g. northwind-asvcplan-webbackend-test. If you are unsure what SKU to use, Basic B1 is often good enough for test environments (change as necessary later).
App service (Web app)
Create an app service (called Web app in the portal GUI)*, name e.g. northwind-asvc-webbackend-test. Configure as follows:
- [Basics] Publish: Container (Linux).
- [Basics] Pricing plan: Your previously created app service plan.
- [Container] Image source: Quickstart (we will change this later via environment variables and the service connections).
- [Networking] Enable public access: On.
- [Networking] Enable virtual network integration: On.
- [Networking] Enable VNet integration: On.
- [Networking] Outbound subnet:
default. - (Optional) [Monitor + secure] Enable Application Insights: Yes.
- (Optional) [Monitor + secure] Click "Create new" under Application Insights. Name the resource e.g.
northwind-appins-webbackend-test. - (Optional) [Monitor + secure] Enable Application Insights: Yes.
*There are also container apps with a different feature set, we have not tested them.
Key vault connection
After creation this app service must be configured to use our managed identity when interacting with our key vault. This is done in two parts, first via the portal GUI and then Azure CLI. If you do not have Azure CLI set up, do so now. Begin with assigning the identity to the web app by navigating to the web app and clicking "Identity" under the "Settings" blade. Switch to the "User assigned" tab and add your previously created managed identity.
Secondly, we must assign the identity to be used when accessing the key vault. See more here or read on.
First, authenticate to the client's tenant using az login.* Then to retrieve the correct information and assign it, run the following commands:
identityResourceId=$(az identity show --resource-group <group-name> --name <identity-name> --query id -o tsv)
az webapp update --resource-group <group-name> --name <app-name> --set keyVaultReferenceIdentity=${identityResourceId}
Note: Adjust the syntax for PowerShell if you use that. It's also possible to copy/paste the ID and add it manually, if you do so then simply run az identity show [...] and copy in the result directly after [...] keyVaultReferenceIdentity= without any added quotes or ticks - the plain value works fine.
*This can be done in Azure Cloud Shell, but setting up a cloud shell workspace has side effects within the client's tenant (needs a personal storage account), so just work locally instead.
"Help, I am having problems with applying the changes in the CLI." - Hopefully not you.
Verify you performed both steps above and try running the command with the --debug parameter to get more information.
SQL service connection
Navigate to "Settings" -> "Service connector" and create a new service connector for Azure SQL. Configure as follows:
- [Basics] Pick your database and choose Client type as ".NET".
- [Authentication] User assigned managed identity.
- [Networking] "Configure Virtual Network service endpoint to enable access to target service."
This outputs an Azure CLI script for you to run. Do so now and choose "y" if prompted to change the SQL Administrator to your current Entra ID account. You can revert this later if needed.
Environment variables
See a previous installation for a full example but some important ones are listed here.
All of these values should be added as Slot setting: true.
ASPNETCORE_ENVIRONMENT:Development,StagingorProduction.ASPNETCORE_FORWARDEDHEADERS_ENABLED:true.ASPNETCORE_URLS:http://+:80.AZURE_CLIENT_ID: Enter the client ID of the user-assigned managed identity.AZURE_SQL_CONNECTIONSTRING: Automatically added when creating our service connection. Unlike the connection string we map for "umbracoDbDSN" this only specifies the authentication to use to the database.DOCKER_REGISTRY_SERVER_URL: Delete this variable if present.DOCKER_REGISTRY_SERVER_USERNAME:@Microsoft.KeyVault(VaultName=northwind-kv-webbackend-test;SecretName=dockerregistryusername).DOCKER_REGISTRY_SERVER_PASSWORD:@Microsoft.KeyVault(VaultName=northwind-kv-webbackend-test;SecretName=dockerregistrypassword).PORT: Set to80.Umbraco__Storage__AzureBlob__Media__ConnectionString:@Microsoft.KeyVault(VaultName=northwind-kv-webbackend-test;SecretName=storageconnectionstring).WEBSITES_PORT:80. Not sure if this is needed.
Contextually important variables:
- (Umbraco Foundation)
Media__DomainHost:northwind-asvc-webbackend-test-abcde01234.swedencentral-01.azurewebsites.net. Slot setting:true. - (Umbraco 14+)
Umbraco__CMS__Security__AllowConcurrentLogins:true. Allows multiple users to log onto the same account in backoffice. - (Umbraco 14+)
Umbraco__CMS__Security__BackOfficeHost:https://northwind-asvc-webbackend-test-abcde01234.swedencentral-01.azurewebsites.net. Required for backoffice logins. Slot setting:true. - (Umbraco 14+)
Umbraco__CMS__WebRouting__UmbracoApplicationUrl:https://northwind-asvc-webbackend-test-abcde01234.swedencentral-01.azurewebsites.net. Required for backoffice logins. Slot setting:true.
For a first time installation, you must either seed a database with SSMS (which can be difficult depending on your connection capabilities to Azure SQL), or perform an unattended install. Set the following values if you wish to do so.
Umbraco__CMS__Unattended__InstallUnattended:true.Umbraco__CMS__Unattended__UnattendedUserName:Cloud Nine.Umbraco__CMS__Unattended__UnattendedUserEmail:dev@cloudnine.se.Umbraco__CMS__Unattended__UnattendedUserPassword: Put your generated password here from 1Password.
Note: If you click "Advanced edit" you get a JSON of all your values, which can be easier to work with.
Note: If a key vault reference has been added or changed it will not automatically update the running application. Click "Pull reference values" to update. This restarts the application.
The application's connection string(s) are added under the separate tab "Connection strings" and not the default view "App settings". Open the tab and add the connection string umbracoDbDSN with the value like @Microsoft.KeyVault(VaultName=northwind-kv-webbackend-test;SecretName=sqlconnectionstring) and type "Custom".
Path mappings
Navigate to "Configuration" under the "Settings" blade, then go to the "Path mappings" tab.
Add a new Azure storage mount like the following:
- Name:
umbraco-logs. - Storage account: Choose yours.
- Select "Azure Files" (SMB).
- Select the
umbraco-logsstorage container. - Enter the mount path as
/app/umbraco/Logs. - Deployment slot setting:
false.
Repeat the above process to create a storage mount for the media cache as well:
Add a new Azure storage mount:
- Name:
umbraco-media-cache. - Storage account: Choose yours.
- Select "Azure Files" (SMB).
- Select the
umbraco-media-cachestorage container. - Enter the mount path as
/app/umbraco/Data/TEMP/MediaCache. - Deployment slot setting:
false.
Optional: Configure the values under the "General settings" tab to only allow HTTP/2.
Optional: Not covered in this guide: Session affinity settings.
Frontend test
Resource group
Create a resource group the same way we did for backend. Name e.g. northwind-rg-webfrontend-test.
Managed identity
Create a user-assigned managed identity like with the backend app. Name e.g. northwind-mid-webfrontend-test.
Vnet
Create a virtual network with a single subnet (default). This can be done in the key vault creation wizard as well, which might save you a few clicks.
Key vault
Create a key vault. Configure it to be available from our L2TP VPN IP (193.234.23.132/32) and the virtual network. Also check "Allow trusted Microsoft services to bypass this firewall".
Assign the managed identity the following roles:
- Key Vault Certificate User
- Key Vault Secrets User
Also assign our administrative account(s) as "Key Vault Administrator".
Add the following secrets as applies to your project (the names can be changed if wanted):
Why two key vaults with duplicated secret values?
Mostly for the hygiene/security factor. We could allow change the backend key vault's firewall rules to also allow reading from the frontend app's virtual network, but this would allow the frontend app to gain access to other secrets as well.
App service (Web app)
Create a web app for the frontend application, e.g. northwind-asvc-webfrontend-test, then perform the following:
- Integrate the app service with the frontend's virtual network.
- Assign the user-assigned managed identity to the app service.
- Update the app service to use the managed identity when fetching secrets from the key vault (same as backend).
Optional: If you want to enable logging from sdtout/stderr from within the container if the frontend application is only using console.log(), follow these steps:
- Open the "Monitoring" blade and click "App Service logs".
- Toggle application logging from "Off" to "File system". Set the retention period and hit save.
- Logs can now be accessed either via the log stream or by clicking "Current Docker logs (Download as zip)" in Kudu.
Optional: You can lock the frontend application behind Entra ID authentication if wanted. This is not covered by our docs at this time, but you may read more on MSDN and see projects that have done this in the past.
Environment variables
Set the following environment variables:
DOCKER_REGISTRY_SERVER_URL: Delete this variable if present.DOCKER_REGISTRY_SERVER_USERNAME: See backend, but use the frontend's key vault.DOCKER_REGISTRY_SERVER_PASSWORD: Same as above.UMBRACO_API_URL: The backend app's URL (custom, dependent on the frontend app's implementation).WEBSITES_PORT:80.
Azure DevOps (2)
Set up release pipelines to both front- and backend. The Umbraco Foundation has yaml-files you can use for releases, or you create a release pipeline within the GUI using the "Deploy Azure App Service" task (AzureRmWebAppDeployment@4).
Example settings (see previous projects for a more clear example):
- ConnectedServiceName: '[guid]'
- WebAppKind: 'webAppContainer'
- WebAppName: 'northwind-asvc-webbackend-test'
- DockerNamespace: 'cloudnine.azurecr.io'
- DockerRepository: 'clients/northwind-web-backend'
Production
If everything works in test now, pat yourself on the back and move on with the production environments!
This is almost exactly a repeat of the test environment setup, with the only differences being in hardware scaling. Apply as is most appropriate to your needs and use other projects as a reference point.
Service connections do not need to be replicated as the same connection is used for both test- and production environments.
Suggested differences are included below.
Backend prod
Storage account
Configure the same as test, but change the following values:
- [Basics] Redundancy: Geo-redundant storage (GRS) + "Make read access to data available in the event of regional unavailability". This will create the storage account as RA-GRS.
App service plan
Configure the same as test, but may want to choose an more hardware-capable plan instead of a basic one (e.g. Premium v3 P0V3). Keep in mind that if created as a basic plan now, zone redundancy cannot be added later (but we do not usually need that). It should also be possible to create a new app service plan later and reconfigure the web app, but that is untested.
Frontend prod
Same as the test environment.